Hashbrown casserole is so easy to make. And so delicious. It can be for breakfast or for supper. If you like onions and bell pepper, you can saute them in olive oil and then add to the casserole for a little different taste. If you want to make it a main dish instead of just a side dish, you can add ham. It is great to make if you have left-over ham from Thanksgiving or Christmas and you just can't eat another ham sandwich. If you don't want to peel and grate the potatoes, it is perfectly fine to buy a bag of frozen hashbrowns.
The ingredients are:
6 potatoes, peeled and grated
8 ounce block of sharp cheddar cheese, grated
16 ounce sour cream
Cream of mushroom soup (or cream of chicken soup)
Salt
Pepper
Mix all the ingredients together in a large bowl.
Spray a casserole baking dish with cooking oil. Pour the hashbrown mix into the casserole dish.
And bake on 350 degrees for about 45 minutes.
Then enjoy one of the best comfort foods available.
Saturday, August 25, 2012
Homemade Organic Shampoo
I have become deeply interested in becoming less dependent on manufactured chemicals for cleaning my home and washing my clothes. And now I have taken that to a personal level and decided to try making organic shampoo.
First I became interested in using essential oils. And as I researched the many uses for essential oils, I decided I needed to buy some to try. I looked on the internet and found a website that sells pure essential oils at Ananda Apothecary. I ordered Rosemary, Lavender, Sage and Tea Tree essential oils on Friday. They arrived on Monday. That is great service! AND they give free shipping on the first time order. This is the link: http://www.anandaapothecary.com/. On this website I also found a recipe for a blend of essential oils that would promote healthy and vigorous hair growth.
Then I bought a book at Books A Million entitled "The Complete Book of Essential Oils & Aromatherapy" by Valerie Ann Worwood.
In the book I found a recipe for soap stew, which the author uses as a base for her shampoo. To the base, I added the carrier and essential oils that were listed on the website. The author also has blends of essential oils listed in her book and they are very similar to the blends I found on the internet. Here are the ingredients to the blend that I decided to try:
1 bar Castile soap
1 quart water
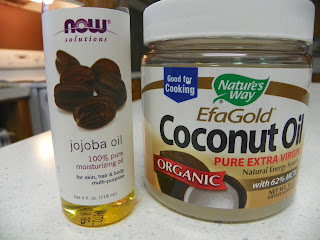
2 ounces Jojoba oil
2 ounces Coconut oil
64 drops Lavender essential oil
64 drops Rosemary Verbenone essential oil
16 drops Sage essential oil
Castile soap is 100% pure.
Jojoba oil is deeply hydrating for dry hair and scalp. Coconut oil is cooling and nutritive to hair and scalp and has a history of being used for hair growth.
The rosemary verbenone essential oil is good for stimulating the scalp and hair. The verbenone chemotype has ketones specific to the regeneration of dermis and follicies. Lavender is good for all types of hair because it has cooling, stress relieving and regenerative properties. Sage can stimulate hair growth and is a highly regarded scalp and hair tonic.
So I grated the Castile soap.
Added the water and let it cook on medium heat until all the soap had melted.
I let the soap stew cool. Then added all of the oils. I placed this in a plastic jar with a lid. And here it is: Homemade Organic Shampoo. The shampoo will turn into a gel overnight. If the oils are on the top, just stir it up before each use.
Labels:
DIY
Saturday, August 18, 2012
Chicken Pot Pie
Chicken pot pie is so good and so easy to make. And it's easy to customize to exactly how you like it. If you don't like one of the vegetables, leave it out or switch it with another vegetable.
Ingredients:
2 Chicken breasts
4 potatoes, peeled and diced
2 carrots, peeled and diced
1 cup butter beans, green beans, or english peas
1 cup corn
1 onion, diced
1 can cream of mushroom soup (or cream of chicken)
salt to taste
pepper to taste
Crust: 1 stick butter, 1 1/2 cups self rising flour, 1 cup milk
Directions:
Preheat oven to 350 degrees. Place chicken breasts, salt, and pepper in pot and cover with water. Cook until done. Remove chicken breasts from broth to cool, but save broth.
Place vegetables and onion in chicken broth and cook on medium heat until done. (Add water if there is not enough broth to cover the vegetables.)
Once the vegetables are done, stir in the cream of mushroom or chicken soup.
Remove the chicken from the bone and cut up into small bite sized pieces. Add the chicken to the vegetables and then place in baking dish.
Make the crust by melting the stick of butter in the microwave on low heat. Stir the butter, self-rising flour and milk together. Spoon over filling until completely covered.
Bake for 1 hour at 350 degrees. (Or until the crust is brown and the filling is bubbly.)
Let rest for a few minutes then serve. Now you can enjoy your very own delicious homemade chicken pot pie. Yum! It's so good on a cold winter's day. Or any day for that matter.
Homemade Laundry Stain Remover
Ok. Lately I have been trying all this homemade stuff. I think it's great. This homemade stain remover is one of the easiest things I have found. And it works! That is the best part. It's easy, it's cheap, it works. That's all I need to know. This is the simple way to make homemade laundry stain remover: Mix 1 part Dawn dish washing liquid with 2 parts hydrogen peroxide. That's it. What could be easier? So if you only want to use it as you need it, you can mix 1 tsp Dawn with 2 tsp Peroxide. If you want to have a bottle on hand when you need it, you can mix 1 cup Dawn with 2 cups Peroxide. Put this in a spray bottle and there you go. Handy dandy stain remover.
This is the link for the recipe. There is also a recipe for using peroxide for household stains on this page.
http://www.themakeyourownzone.com/2012/02/homemade-stain-removers-with-hydrogen-peroxide.html
Labels:
DIY
Homemade Jewelry Cleaner
I ran out of jewelry cleaner a while back and I kept forgetting to buy more. So when I saw the recipe for homemade jewelry cleaner, I thought I would try it out. This is the recipe and I found it at: http://www.food.com/recipe/jewelry-cleaner-180133
Ingredients:
1 tablespoon salt
1 tablespoon baking soda
1 tablespoon dish detergent
1 cup water
1 piece aluminum foil
Directions: Heat water in the microwave for 1 or 2 minutes. Cut a piece of aluminum foil that roughly covers the bottom of a small bowl (like a cereal bowl). Mix hot water with salt, soda, and dish washing liquid and pour into bowl.
Jewelry before:
Place jewelry on top of foil and let it sit for 5 to 10 minutes. Rinse jewelry in cool water and dry jewelry completely with soft cloth. Discard solution after use and make a new batch next time.
Jewelry after:
I don't know if you can tell a difference from the photos before and after I cleaned my jewelry. But there was a definite sparkle and shine after I cleaned them. This was very easy and I had all the ingredients on hand. I will definitely do this again to clean my jewelry.
Labels:
DIY
Friday, August 17, 2012
Essential Oils - What are they?
I have been reading about essential oils and it seems the more I read, the more essential oils I uncover, and the more information I find. This has opened up a whole new world to me. I have never heard of essential oils before but now I am intrigued and want to know more and more. But my head is spinning from all this information, so I have to concentrate on the basics.
First, what are essential oils?
Essential oils are the natural aromatic compounds found in the seeds, bark, roots, flowers, and other parts of plants. If you squeeze the peel of a ripe orange, the residue in your hand is full of essential oils. In fact, orange oil is widely produced by pressing the rind of the orange. Essential oils are non water-based phytochemicals made up of volatile organic compounds. Essential oils are very clean, almost crisp, to the touch and are immediately absorbed by the skin. Essential oils have been used throughout history in many cultures for their medicinal and therapeutic benefits.
The Egyptians were some of the first people to use aromatic essential oils extensively in medical practice, beauty treatment, food preparation, and in religious ceremony. Frankincense, sandalwood, myrrh and cinnamon were considered very valuable cargo along caravan trade routes and were sometimes exchanged for gold. The Greeks used essential oils in their practices of therapeutic massage and aromatherapy. The Romans also used aromatic oils to promote health and personal hygiene. Influenced by the Greeks and Romans, as well as Chinese and Indian Ayurvedic use of aromatic herbs, the Persians began to refine distillation methods for extracting essential oils from aromatic plants. Essential oil extracts were used throughout the dark ages in Europe for their anti-bacterial and fragrant properties.
In modern times, the powerful healing properties of essential oils were rediscovered in 1937 by a French chemist, Rene-Maurice Gattefosse, who healed a badly burnt hand with pure lavender oil. A French contemporary, Dr. Jean Valnet, used therapeutic-grade essential oils to successfully treat injured soldiers during World War II. Dr. Valnet went on to become a world leader in the development of aromatherapy practices. The modern use of essential oils has continued to grow rapidly as health scientists and medical practitioners continue to research and validate the numerous health and wellness benefits of therapeutic-grade essential oils.
Well, I don't know about you, but I'm sold on essential oils. I have been looking for natural products, and these are just about as natural as you can get. So I have ordered a set of different essential oils and once I have tried them out, I will post a blog to report my findings.
Labels:
info
Tuesday, August 14, 2012
Essential Oils - Tea Tree Oil
My supervisor, Mrs. Tammy Meyer, was telling me today that she has found a great little oil that has helped her in numerous ways. She was speaking of tea tree oil. So I told her I would have to research this essential oil and see what information I could find. Once I started looking, I found a great deal of information about all kinds of essential oils.
But to begin with, I focused on tea tree oil. This is what I found. Tea tree oil is good for a variety of ailments, including but not limited to: acne, athlete's foot, candida, chicken pox, cold sores, colds, corns, cuts, flu, insect bites, itching, migraine, oily skin, ringworm, sinusitis, sores, spots, and warts.
Wow! That is a wide variety of ailments that one little essential oil can help.
I found a list of uses for tea tree oil at this website: http://bodyecology.com/articles/tea_tree_skin_miracle.php
And here is an excerpt from the website:
Dana Young, founder of TRUessence Essential Oils, suggests that you can use tea tree oil in the following ways:
■Directly on your skin in the area affected. For cuts and sores, add 1-2 drops to targeted areas.
■Mixed with a carrier oil. Mix 3 - 5 drops with a carrier oil and apply to skin after a bath or shower.You can make your own Body Ecology friendly carrier oil by using a lightly scented oil like almond oil that is unrefined and organic.
■A household cleaner. Add to water and vinegar for a non-toxic household cleaner.
■Treatment for lice and dandruff. Rinse your hair with warm water and 2 drops of tea tree oil to control lice and dandruff.
■Healing bath. Add 6 drops to your bath water for a soothing soak.
As with every product, there are some safety concerns with tea tree oil. I found these listed at: http://altmedicine.about.com/od/herbsupplementguide/a/TeaTreeOil.htm. Tea Tree Oil should never be taken internally. And one study shows that it might alter hormone levels. So use in moderation and never drink it, ever!
Labels:
info
Benefits of Organic Apple Cider Vinegar
As I have said before in a previous post, our little beagle, Bailey, is precious to us. She is a wonderful addition to our family. But our little beagle gets sick regularly. I have made numerous visits to the vet over the past 3 years. Now I am not rich by any means and all these vet bills were putting a huge dent in my finances. So I began trying to find some way to help her without breaking the bank. While doing research for a home remedy to my little dog's stomach problems, I became aware that organic apple cider vinegar has many benefits. All the websites related to apple cider vinegar list many different benefits and uses for humans and for animals. So I thought I would try out one of the remedies for Bailey. I began adding 1/2 tsp to her food each day and for the past 3 weeks she has not had any more stomach problems. There might be something to this apple cider vinegar after all.
Organic apple cider vinegar can be found just about anywhere. I found it at Publix for $4.29 for a 16 oz bottle. You can also find it on amazon.com. Here is a link: http://www.amazon.com/Bragg-Apple-Cider-Vinegar-liquid/dp/B001AIWAAE/ref=sr_1_1?ie=UTF8&qid=1344950006&sr=8-1&keywords=organic+apple+cider+vinegar+with+mother
More of the benefits of apple cider vinegar for dogs include:
1. After bathing your dog, rinse with a solution of half water and half apple cider vinegar. It will make the dog's coat feel softer and have a healthy shine. Also the apple cider vinegar will reduce itchy skin and will help repel fleas.
2. If your dog has brown tear stains under his eyes, adding apple cider vinegar to their food will reduce or even eliminate the tear stains.
3. ACV is anti-bacterial, anti-fungal, and antiseptic. It helps prevent bacterial and viral growth in the digestive tract. In addition, it does not upset the balance of the friendly bacteria inside the GI tract. As a result, apple cider vinegar boosts the immune system. It improves stamina, increases resistance to diseases, prevents common infections, and is therefore helpful for dogs with weakened immune systems.
4. ACV can help prevent bladder stones, kidney infections and urinary tract infections when added to the dog's food or water.
5. ACV breaks down calcium deposits in a dog's joints and will help reduce pain from arthritis and joint problems.
Here is a very good website that has a lot of information regarding apple cider vinegar for dogs:
http://www.whole-dog-journal.com/issues/15_01/features/Pet-Uses-Of-Apple-Cider-Vinegar_20435-1.html
--------------------------------------------------------------------------------------------------------
Apple cider vinegar also has many health benefits for humans. The potassium in ACV can help prevent brittle teeth, hair loss and runny noses. The pectin can help regulate blood pressure and reduce bad cholesterol. The calcium in ACV helps build strong bones and teeth. The acetic acid slows the digestion of starch which helps lower the rise in glucose that commonly occurs after meals. Apple cider vinegar can also help humans with their skin problems. (just like for dogs) And it can also help with joint pain. (just like for dogs) ACV also helps breakdown fats so that your body will use them instead of store them for later.
Apple cider vinegar can also be used as a natural hair care product. Rinsing with ACV will help balance the PH of your hair and will remove the build-up that occurs from the use of too many styling products. The acids and enzymes in ACV is a good remedy for anyone with dandruff, itchy scalp, or hair loss.
Of course, I need to mention that Web MD is not so impressed with the benefits of apple cider vinegar and does not endorse its use. Web MD does state that studies have shown that ACV may help lower glucose levels for people with diabetes. Other studies have shown that ACV might help lower cholesterol. But Web MD is quick to point out that all studies are preliminary and not proven. This is the link to the Web MD article: http://www.webmd.com/diet/apple-cider-vinegar. You can read it for yourself and form your own opinion as to whether you feel apple cider vinegar would be beneficial to you.
Labels:
info
Sunday, August 12, 2012
Fiesta Skillet
I found a version of this recipe in a magazine. I have made it several times and each time I have added to it, taken away from it, and changed some of the ingredients until I settled on my favorite version. My family always love when I say "it's fiesta skillet night!" I hope you enjoy it too.
P.S. I use the original Ro-tel tomatoes. But you can always use the mild or hot, depending on how spicy you like your food.
Ingredients:
1 lb ground beef
1 small onion
1 tbs parsley
1 cup bell pepper
garlic powder
2 cans Ro-tel tomatoes
1 can black beans
1 can whole kernal corn, drained
1 cup sliced mushrooms
1/4 tsp cayenne pepper
salt and pepper to taste
8 oz shredded cheddar cheese
16 oz sour cream
1 bag Fritos scoops
Brown beef with onion, bell pepper, and parsley in a large skillet.
Add garlic to taste. Add tomatoes, beans and corn. Cook on medium until hot and bubbly. Add mushrooms, cayenne pepper, salt, and pepper.
Stir in about 3/4 cheddar cheese. Turn off heat and stir in half of the sour cream.
When ready to serve, have each person put a layer of Fritos scoops in their bowl first.
Then spoon the fiesta skillet mixture over the Fritos scoops.
Then top with additional sour cream and cheddar cheese. YUM!
Friday, August 10, 2012
Canning Tomatoes
I have always been intimidated by canning. I felt that it was not something that I could ever hope to accomplish. Well, a few weeks back a friend of my husband's kept giving him tomatoes every day out of his garden until we had a whole bunch of tomatoes. We tried to eat them all fresh, but I can only eat so many tomato sandwiches at one time! So I decided to try my hand at canning. Let me tell you, it was not hard and I actually had fun doing it! I found the step-by-step instructions on the internet at http://www.pickyourown.org/canning_tomatoes.htm
I used quart canning jars, a large pot for boiling the tomatoes and a large pot for sterilizing the jars, lids, and rings.
I put the tomatoes in a large pot and covered them with water. I turned the heat on high and let the water come to a boil. I let them boil for about 1 minute, then I poured them into a cold bowl of water. Once the tomatoes had cooled off a little, I removed the skins, the tough part of the stem and any bruised parts. I then cut the tomatoes up into chunks. I held the tomatoes over a bowl while I cut them up which allowed me to have the tomato juice too. I removed the jars from the boiling water and filled each jar with the tomatoes. I added a little lemon juice to each jar. My tomatoes had enough juice that I did not have to use boiling water or tomato juice to finish filling up the jar. I wiped each jar rim to make sure the lids would seal. Then put the lids and rings on each jar. Make sure the lids are snug, but not too tight. Place the filled jars in a large pot and cover with water at least 1 inch above the jars. Keep the water boiling for 45 minutes for quart jars. (40 minutes for pints) After 45 minutes, remove the jars from the boiling water. Let them cool. You will hear each jar when it seals because it will make a popping sound. You can check each jar by pressing in the center of the lid. If it will pop up and down, then it is not sealed.
The website that I mentioned above has a list of frequently asked questions. It is very helpful for first-time canners like me!
Pimiento cheese
Pimiento cheese is one of my favorite foods. I think of it as a comfort food. This is a recipe I found in an old Southern Living magazine and it is so easy to make. Once you have the pimiento cheese made, it's better after it has been in the fridge for a day to give all the flavors time to mix together into yummy deliciousness.
Give it a try!
Ingredients:
1 1/2 cups mayonnaise
1 (4 oz) jar diced pimiento, drained
1 tsp finely grated onion
1/4 tsp ground red pepper
2 (8 oz) blocks sharp cheddard cheese, shredded
Mix all indredients together and refrigerate. This can be stored in the refrigerator up to 1 week.
Wednesday, August 1, 2012
natural hair repair mask
Lately I have become very interested in natural remedies and homemade items. I am currently researching the benefits of organic apple cider vinegar, but that will be in a separate post. In the meantime, I have discovered this natural hair repair mask that I find very interesting because one of the ingredients is apple cider vinegar.
My hair has always been frizzy. And I have always over-processed it by using a blow dryer and curling or flat iron. Then a couple of weeks ago I got a perm. And ever since, I have had a hard time trying to keep it from being a frizzy poof ball. So when I found the hair repair mask recipe, I felt I needed to at least try it one time. I mean, what could it possibly hurt?
I found the recipe at: http://theberry.com/2012/05/13/sunday-brunch-60-photos-29/sb-random-36-31/
2 tbsp honey
1 tbsp apple cider vinegar
1 tbsp olive oil
Mix the ingredients and apply to dry, unwashed hair starting at the roots and combing all the way to the ends. Leave on for 30 to 60 minutes. Rinse mixture from hair and shampoo well.
Ok. So that's the recipe. I mixed everything up and it was very thick. So I stuck it in the microwave for 10 seconds. That helped thin it out some. But it was still very hard to get it on my hair. I made a huge mess and finally ended up just pouring it in my hands, rubbing my hands together to spread it on both hands and then running my hands through my hair. It was very hard to comb the mixture through my hair, so I just used my hands to get it all the way to the ends. Then I let it sit on my hair for 60 minutes.
It was very hard to rinse out of my hair. I felt that I had to shampoo it twice to get all the honey out. Once my hair was dry, I couldn't tell any difference. I hate to say that I do not think this hair repair mask has helped my hair at all. Maybe it takes more than one application. I don't know. But I don't think I will be willing to try it again.
Labels:
DIY
Subscribe to:
Posts (Atom)